Hello Friends!

Welcome to Three That Inspire, I’m so glad you are here!  I pray you will find good things here by the three that inspire me: our glorious God, our fantastic family and our happin’ homeschool.  I hope you will find inspiration, instruction and inclusion.   Humbly I come before you with what I hope will be helpful in your walk with Christ, your crazy family life and many things homeschool.  Thanks for being here at the start, it means the world to me!

Hold on, its going to be a wild ride!!

Beeep—beeep—beeep—This  is a test of the blog post system, this is only a test…if this had been an actual blog post the noise you just imagined would have been followed by silly stories, invaluable information or vivacious videos.  I hope to build a community with you all as members, as family.  So join us and we can all share, support, and survive this journey together.


VanCleave Experiments

Janice VanCleave’s 201 Awesome, Magical, Bizarre & Incredible Experiments


To complete this experiment you will need a copy of Janice VanCleave’s 201 Awesome, Magical, Bizarre & Incredible Experiments.  You can purchase it here: Janice VanCleave’s 201 Awesome, Magical, Bizarre, & Incredible Experiments


VanCleave Experiements

VanCleave #024: Mirage

This experiment  has to do with light refraction in the atmosphere.  Not only does light refraction change the shape of the sun and location it is also what makes it (and the moon) seem larger when they are closer to the horizon.  This experiment is compatible with Classical Conversations.

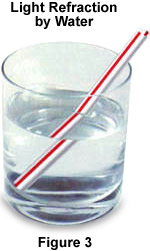
This is a pretty classic experiment that can even be simplified with a straw in water.  If you have time, drop a pencil in the water and take a look!refractionfigure3

Reference: https://micro.magnet.fsu.edu/optics/lightandcolor/refraction.html

I like the “magic” of this experiment as the coin appears to jump back into view as the water is added!!  Neat!!  Light particle or photons are tiny particles that move through space.  They travel at different speeds in different environments, just like we run faster on land and slower in water or even slower in quicksand!  When light changes speeds, i.e. goes from air to water or water to air, it changes directions.  Believe it or not light travels about the same in space (a vacuum, no air) as it does in air, but it slows down in water.  When light travels through the atmosphere, the thicker the atmosphere, the slower the light.  When the sun is at the horizon, there is enough atmosphere to slow the light just enough to make the sun appear to rise a bit early or set a bit late.

Now for some questions:

  1. What are the steps of the Scientific Method?
  2. Why kind of hypothesis do we want to use (ex. a yes/no question or IF/THEN statement)?
  3. What are the materials?
  4. What is the procedure?
  5. Did the coin move?
  6. What made the coin appear to move?
  7. What are some differences between water and air?
  8. Would this work with a different coin?
  9. What would happen is the water was emptied?
  10. Has anyone seen the sun “hovering” above the horizon at sunset or sunrise?

Sunset_sequence_18042011_lgym[1]

Reference:  http://epod.usra.edu/blog/2011/05/color-of-the-setting-sun.html

VanCleave #026: Distortion

This experiment is a direct tie in with #024, it is all about how the sun’s rays travel through the atmosphere.   This experiment is compatible with Classical Conversations.

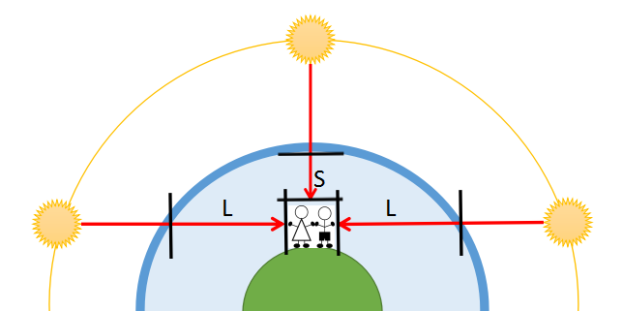
If we stay in our backyard from just before sunrise until just after sunset we would be able to witness the sun travel across the sky (is that entirely accurate?  Who is doing the traveling?  Oh yeah, the earth!) at least from our perspective!  As the Earth rotates we view the Sun through different parts of the atmosphere.  In the drawing below you see kids standing on the Earth.  OK, this is really, really, REALLY not to scale but it is to show how the Sun’s rays travel through different amounts (distances) of the atmosphere during the day.  The green circle is the Earth, the blue area is the Atmosphere and the Sun are the yellow objects above the Atmosphere.  Again, it is easier to “move” the Sun for the purpose of  understanding.

During Mid-day, the Sun is directly above our friends and the Sun’s rays travel Distance “S” (red arrow between two black lines) through the Atmosphere.  It is the shortest distance and the amount the light photons in the Sun’s rays bend is lowest and the Sun appears smaller at Mid-day.  During sunrise or sunset the Sun’s rays travel Distance “L” (red arrow between two black lines) through the Atmosphere.  It is the longest distance and the amount the light photons in the Sun’s rays bend towards the earth is greatest and when light bends, the shape we see changes, in this case bigger and kind of squished.  So the Sun looks bigger when viewed through thicker layers of the Atmosphere.  How does this relate to our experimental set-up?  Keep reading!!Sun Atmosphere

Since we can’t take our kiddos up to the upper atmosphere we use a magnifying glass to simulate the effect.  The magnifying glass lens (plastic or glass) is made just for, well magnifying.  This means that the lens has a convex shape and it thickest in the middle and thinner at the edges.  This website does a good job explaining it for kids.  The light is bent in the middle and makes the image of the object, in this case the circle, bigger.  If you move the magnifying lens you can “warp” the shape of the circle as the light travels through the different thickness in the lense.  And it is this “warpness” that make the sun and moon look bigger on the horizon and then as the sun sets it appears to flatten as the light bends most of all and “warps” the last bit of the sun to the max!

Tips for making the experiment a success:

  1. Print out a circle image, or more than 1, to have handy during science time, drawing with a compass takes some skill and time and it is not critical to the intent of the experiment.  Some kids (and tutors!) may get frustrated.
  2. Move the magnifying glass slowly back and forth, this e can be subtle.
  3. If your magnifying glass is big enough you may be able to feel the thickest part of the lens in the middle.

A few questions:

  1. What are the steps of the Scientific Method?
  2. Why kind of hypothesis do we want to use (ex. a yes/no question or IF/THEN statement)?
  3. What are the materials?
  4. What is the procedure?
  5. What are some other devices that use lenses?  Telescope, microscope, binoculars, etc.
  6. Anyone wearing glasses?
  7. Has anyone seen how light bends in a magnifying glass but instead of using it to magnify, you can see the light being focused or “concentrated” on one spot?
  8. The more lenses you put together (in the right configuration) you can see very far away or separate out each color of the visible light spectrum, like a “rainbow” from a crystal or like the atmosphere does with water drops to make a rainbow in the sky!
  9. Week 8, Science: What some parts of the sun?
  10. Week 10, Science: What are the phases of the moon?
  11. Week 22, Science: What are three characteristics of light?

Speaking of the light of the moon:  This really cool thing is happening tonight!! (August 12, 2016)

Meteors, moon and planets on August 12


VanCleave #002: Shaded

To complete this experiment you will need a copy of Janice VanCleave’s Awesome, Magical, Bizarre & Incredible Experiments.  You can purchase it here: Janice VanCleave’s 201 Awesome, Magical, Bizarre, & Incredible Experiments

Before you begin this or any VanCleave Experiment please read this post first!


Let’s Get Started:

The experiment is pretty straight forward.  And quick…hmmm…here are some questions to stimulate discussion.  Draw from what you already know, bring in the “Big Picture,” connecting the subject of science to other subjects (or one sub-section of science to another) and bring it all back to God!   This experiment is compatible with Classical Conversations and more CC specific tips can be found on CC Connected under user name MomBrown.

  1. What are the steps of the Scientific Method?
  2. Why kind of hypothesis do we want to use (ex. a yes/no question or IF/THEN statement)?
  3. What are the materials?
  4. What is the procedure?
  5. What is a thermometer?
  6. What is shade?
  7. How does using a thermometer give us information?
  8. Can we just stand in the shade and say its cooler than in the sun?
  9. How could we do this differently and still have a valid experiment, i.e. are we following the Scientific Method?
  10. How do the steps of the Scientific Method answer our hypothesis?
  11. How does this relate to the world outside our experimental set-up?
  12. What part of science does this help explore?
  13. Why did we measure two different environments?
  14. What pieces of Science memory work does this experiment relate to?
  15. What does God’s design have to do with shade and temperature?
  16. Why do we need to know about temperature?
  17. How do we feel in the sun or when we have a fever?
  18. Is it a sunny or cloudy day and would that make a difference?
  19. Is shade from a tree with only partial shade different from the shade of a solid building?
  20. Why would shade be important in the different biomes we learn about?  For example, many animals rely on shade in the desert to stay cool (warm blooded animals), while others need the sun’s warmth for energy (cold blooded animals).
  21. Why did God make some animals warm blooded and some cold blooded?
  22. Whereas an arctic fox who “adapts” to his winter environment by growing a white coat can be camouflaged out in the warm sunlight on the white snow.  How cool is it that God made a way for these animals to adapt?

Vancleave #017: Same Place

Again, the experimental set-up is pretty straight forward.  Kids can pair up and each try being the “earth” and each try being the “sun.”  At home you can look up lots of NASA websites about satellites and find lots of cool pictures.   This experiment is compatible with Classical Conversations and more CC specific tips can be found on CC Connected under user name MomBrown.

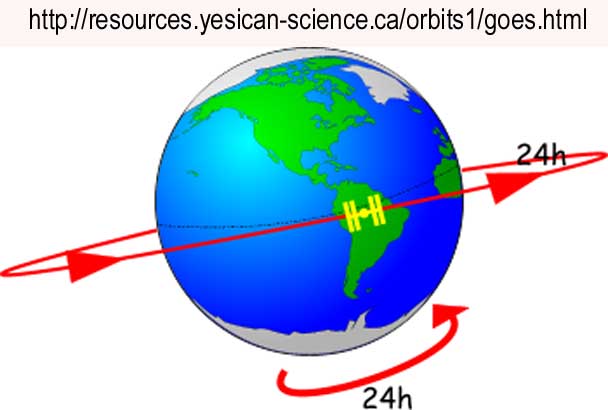
geostationary

But basically we are talking about the satellites that “hover” over the same place on earth, not the ones that move around the earth.  So when two things are moving they have a distance to travel and a certain amount of time to do it.  Speed=Distance/time, i.e. miles per hour.  The earth and the satellite are traveling the same “time,” the time it takes the earth to rotate, just under 24 hours (23 hrs. 56 mins.) but not the same “distance.”  The distance for the earth is very small and it can travel the smaller distance at a slower speed.  But the satellite is farther from the earth and has to travel a greater distance in the same amount of time, resulting in a faster speed.  They are used for primarily 1-way communication, such as Satellite TV and weather stations.

Now for some questions:

  1. What are the steps of the Scientific Method?
  2. Why kind of hypothesis do we want to use (ex. a yes/no question or IF/THEN statement)?
  3. What are the materials?
  4. What is the procedure?
  5. What did you experience as the Earth vs.the Satellite?
  6. What did you see as the Earth vs. the Satellite?
  7. Motions sickness?
  8. Did that correspond to your Hypothesis?
  9. Ask if anyone has Satellite TV or saw a weather radar forecast this morning.
  10. What is an orbit?
  11. Do you think the satellite pushes through space on its own or is pulled along by the earth because of gravity, i.e. its orbit? (gravity, plus small booster rockets to keep the Satellite in place)
  12. Is the moon like the Satellite?
  13. How are the Sun and the Earth like (or not) the Earth and the Satellite? (They are very similar)
  14. How do the Satellites get up into space?

~~Come back and let me know how your week went in the comments below!~~

VanCleave Science Experiments

Cycle 2, Weeks 1-6

Welcome everyone!  This post is for all my CC family out there who would like to add a little Doc Brown to their VanCleave science experiments for Classical Conversations Cycle 2, Weeks 1-6.  If you are not sure what Classical Conversations is please go here and feel free to contact me with any questions.  While Janice VanCleave’s 201 Awesome, Magical, Bizarre & Incredible Experiments are available for anyone, I will be speaking here directly to my greater CC family.  I will make references to the experiments but I cannot reproduce them fully because of copyright.  Look at CC Connected for any additional details, under Cycle 2, Science, Week 1, upload name MomBrown.  Please follow the wisdom of your Director and Tutors and allow me to add to what they are already having you do!  Lets get going…

Each week will have its own post so that you can find them by week.  One gigantic post, I think, would be more confusing!!  That’s not the idea here!!  So Cycle 2, Week 1 is on it way…

Janice VanCleave’s 201 Awesome, Magical, Bizarre, & Incredible Experiments


A CC Forum Post

Addressing a concern from some CC folks about how to fill out our Science Experiment time with the VanCleave Experiments, I posted the following and I want to repost it here in its entirety for all of you!

A Word on Science Experiments and the Five Common Topics

At our community I’m the “science Mom.”  I have always loved discovery and exploration.  My curiosity pointed me toward science from the time I was a little girl.  After a double major in Chemistry and Mathematics in college I went on to earn my Masters and Doctorate in Paper Science and Technology (Engineering, Chemistry, Mathematics, Physics, Biology).  I had no idea how God would come into my life after my career in the academic arena!  I only mention all this to give you just a little background on why I have such a passion for science.  As I grow with Christ, I am more and more in awe of how science brings glorify to God’s creation.  I really love the verse from Practicum this year:  Proverbs 25:2 “It is the glory of God to conceal things but the glory of kings is to search things out.”  This response is not about me, it is for His glory!

During community day, you would find me hanging around the science area.  I was asked by tutors and my director to add a little commentary and depth to our science projects.  I did not “teach” a lesson or “take over” from the tutor.  I simply answered questions and asked a few additional questions to help the tutors create a atmosphere of discussion.  Not until Practicum this summer did  I realize I was essentially using the Five Common Topics; “Definition, Comparison, Relationship, Circumstance and Testimony” in a very informal way.

I’ve seen a common concern in this thread that it can be challenging to fill a full 30 minutes for some of our science projects, especially the VanCleave experiments.  This is not because of the quality of the experiments or the selection made by the CC Academic team.  I think that the experiments resonate with the Foundation Memory work beautifully, creating the layers of information that is central to the trivium.  Seeing this concern I think God has laid it on my heart to share with all of you what my community has done and see if it can help everyone.  Believe me, I know how kiddos (especially my boys) can get “overly energetic” if there is to much empty time to fill!

This year in academic orientation, it is my understanding (please correct me if I missed something) that we are to focus less on lab sheets/worksheets (I love you Miss Wizzle!) and more on observations, using our white boards to sketch or record our observations.  What I took away from that part of training was that during our science experiment/project time, we should be engaging the kiddos through discussion and observation.  Spend time introducing and discussing the vocabulary, going over the Scientific Method and applying it to each specific science experiment/project.  Although worksheets are great reinforcement, academic training emphasized they are better left for at home time.

This is not to suggest we need a full 30 minute lesson plan.  I believe that would not be in-line with the intent of the science experiment/project time as it would put more emphasis on the tutor as the “teacher” over the parent at home and more emphasis on instruction over discussion and observation.  Remember when in doubt think “stick in the sand.”  I think what some of you are asking is…”Is there a happy medium?”  I offer that there is and I would like to give a few examples.

In the article by David Bailey posted in 2013, “The Common Topics and the Universe,” he writes, “Aristotle’s common topics of invention serve as a series of lenses through which we can look at any given subject” and “the topics are points of reference, from which a subject can be studied.”  Read the full article here: https://www.classicalconversations.com/article/common-topics-and-universe

I would like to explore the five common topics in Mr. Bailey’s article; “Definition, Comparison, Relationship, Circumstance and Testimony.”  By using this approach I think it will be hard to keep the discussion within 30 minutes!!  However, this may sound to abstract or confusing or seem to take too much time to figure out for each science project.  I think every tutor and every parent can do this and I think it will be easier than it may appear.

Example:

Janice VanCleave’s 201 Awesome, Magical, Bizarre & Incredible Experiments

#2. Shaded:  (Cycle 2, Week 1)

Topic #1:  Definition:  This is something tutors are doing already;  What is a thermometer?  What is shade?  What are the steps of the Scientific Method?  Why kind of hypothesis do we want to use (ex. a yes/no question or IF/THEN statement)?  What are the materials?  What is the procedure?  Any other “What” questions?

Topic #2:  Comparison:  Again, something tutors typically do naturally; How does using a thermometer give us information?  Can we just stand in the shade and say its cooler than in the sun?  How could we do this differently and still have a valid experiment, i.e. are we following the Scientific Method?  How do the steps of the Scientific Method answer our hypothesis?  Any other “How” questions?

Topic #3:  Relationship:  This may be one area that tutors can develop further but does not need to be as time consuming or difficult as we might think.  What you can draw from here is what you already know and bring in the “big picture,” connecting the subject of science to other subjects (or one sub-section of science to another) and bringing it all back to God; How does this relate to the world outside our experimental set-up?  What part of science does this help explore?  Why did we measure two different environments?  What pieces of Science memory work does this experiment relate to?  What does God’s design have to do with shade and temperature?  Why do we need to know about temperature?  How do we feel in the sun or when we have a fever?

Topic #4:  Circumstance:  Again, maybe a little more development, bringing in the big picture.  Is it a sunny or cloudy day?  Would that make a difference?  Is shade from a tree with only partial shade different from the shade of a solid building?  Why would shade be important in the different biomes we just learned about this morning (Cycle 2, Week 1-What are seven types of biomes?)?  For example, many animals rely on shade in the desert to stay cool (warm blooded animals), while others need the suns warmth for energy (cold blooded animals).  Why did God make some animals warm blooded and some cold blooded?  Whereas an arctic fox who “adapts” to his winter environment (Cycle 2, Week 5-How do animals react to environmental changes?  See the layering effect?) by growing a white coat can be camouflaged out in the warm sunlight on the white snow.  How cool is it that God made a way for these animals to adapt?

Topic #5:  Testimony:  This is asking, what is our authority?  First and foremost I would say that (please correct me if I’m mistaken) CC would like the authority of the science time to be God’s amazing world around us, to explore and observe.  We do not need to bring in five college text books or seven peer reviewed papers with us to talk about “shade.”  We need the authority of what God gave us, eyes, ears, sense of touch, and smell (probably not taste-I always remind the kiddos–safety first–in the lab clear liquid is not always water and little crystals are not always salt or sugar!!)  And of course our ability to put our senses together with our brains and explore!  Second, authority comes from the parents and what they use for science at home.  Deeper questions are for study at home.  Do come along side your parents and gently remind the to participate so that if their child has a deeper question or curiosity, take note and follow up at home.

While CC rightfully stresses the need for the “stick in the sand” approach, I think some of us find that difficult to use during the science experiment/project time.  We all have unique gifts given to us by God and different life situations He guides us through.  This combination gives each of us different “common knowledge” we can apply in the science time with our families.  For me, I know by watching nature shows with my boys that the snowshoe hare and arctic fox grow white coats in the snowy winter for camouflage and, perhaps, gathering the suns rays for warmth.  Did I need to go check my facts in a science book?  Maybe or maybe its a starting point for a discussion that we can follow up on at home.

By using the Five Common Topics, I hope you can see how, with just a little help from the rest of the Foundations Guide and God’s amazing world, we can ask more questions and get the kiddos connecting this peg to that peg and relating this idea to that one.  Even in the grammar stage we can encourage our students to be more dialectic.  I do think it is not as time consuming and intimidating as it may first seem.  I do think we all have the ability to encourage the little scientist in our students with the ways God has already equipped us.  But if you need a few discussion points to help you get started, I hope to have some guidance similar to VanCleave #2 posted on CC Connected before the first week of community, user name MomBrown.  Also, I am always happy to answer questions any time!  May this year bring you and your family closer to our great God and be a blessing to you!

For His Glory,

“Doc” Fern Brown